
Welcome to first part of Quilt Construction for Wendy Sheppard’s Thread Journey Quilt Along! We are so thrilled to be embarking on this journey with all of you and are looking forward to seeing your progress and eventually, your finished quilts. If you’re sewing along and want to share your images on Instagram, please consider tagging Wendy (@ivory_spring), Aurifil (@aurifilthread)and #threadjourneyquiltalong so that we might share in your process!
With that said… here’s Wendy!
– – – – – – – – – – – – – – – – – – – – – – – – – – – – – – – – – – – – – – – –
Hello Friends, here it is! Today is the day we start our Thread Journey quilt. I sincerely hope that making this quilt will mark a fun episode in your own thread journey!
DISCLAIMER:
#1. I intend for YOU to have fun making this quilt. Therefore, you are free to change things around anytime, anyway, or anyhow! It is YOUR quilt.
Elizabeth Bennet in BBC’s Pride & Prejudice said it best, and I quote, “Maria, this is your trunk; these are your gowns. You may arrange them in any way you wish. (whisper) Lady Catherine will never know.”
#2. I understand that this sew-along will reach quilters of various skill levels. Considerable effort is made to present clearly the steps to make this quilt. Basic and common techniques are not presented in detailed, assuming quilters can look up information on the techniques for themselves to prevent this post from being too lengthy. However, if certain hurdles persist in attempting this project, I will do my best to assist you.
#3. Should you have additional questions or need assistance, I will be checking in on this post as often as I can. Please leave your questions in the comments and I will do my best to help you out!
PART 1: FABRIC SELECTION
I thought I would briefly address the issue of fabric selection since a few have asked how I select my fabrics. Honestly, my rules of thumb are “pot-luck” and “the more the merrier” with triple dosages of both when it comes to a scrap quilt (like Thread Journey). I am always surprised at the visual effect when I throw in hot pink and turquoise blue and use them together with bright orange! For this project, I am using the fabrics from Wyndham’s Basic Lines (Palette, Mary’s Blenders).
***
For my quilt center background, I have selected a muted palette that covers a wide range of colors. Muted because it is for the background so that the added applique will pop against the muted background.

I auditioned fabrics of rich and bold hues for the applique pieces.

PART 2: Quilt Center
1. The quilt center finishes at 20″ x 20″. Therefore, it should measure 20 1/2″ x 20 1/2″ raw edge to raw edge.
2. Options (measurements given are unfinished measurements):
- Piece together 10 (2 1/2″ x 20 1/2″) strips
- Piece together 4 rows of 4 (5 1/2″ x 5 1/2″) squares
- Piece together 5 rows of 5 (4 1/2″ x 4 1/2″) squares
- Piece together 10 rows of 10 (2 1/2″ x 2 1/2″) squares
- 1 (20 1/2″ x 20 1/2″) square — no piecing for this one!
3. My version is made with 10 (2 1/2″ x 20 1/2″) strips that are pieced with shorter pieces joined together by diagonal seams.
- A simple way to figure out the Math is to find the combination of numbers that add up to 20 (finished). For example, 6 and 14. So, I would add 1/2″ to one of the numbers, and add 2 1/2″ to the other number in my cutting. In this case, I can cut (a) 2 1/2″ x 6 1/2″ and 2 1/2″ x 14 1/2″ pieces, or (b) 2 1/2″ x 8 1/2″ and 2 1/2″ x 14 1/2″ pieces. This Math works for other combinations of (2 1/2″)-wide strips as well.
- If you don’t want to be bothered with the Math, and still want to use strips pieced diagonally, you can always just piece the strips, and trim the pieces to measure (2 1/2″ x 20 1/2″).
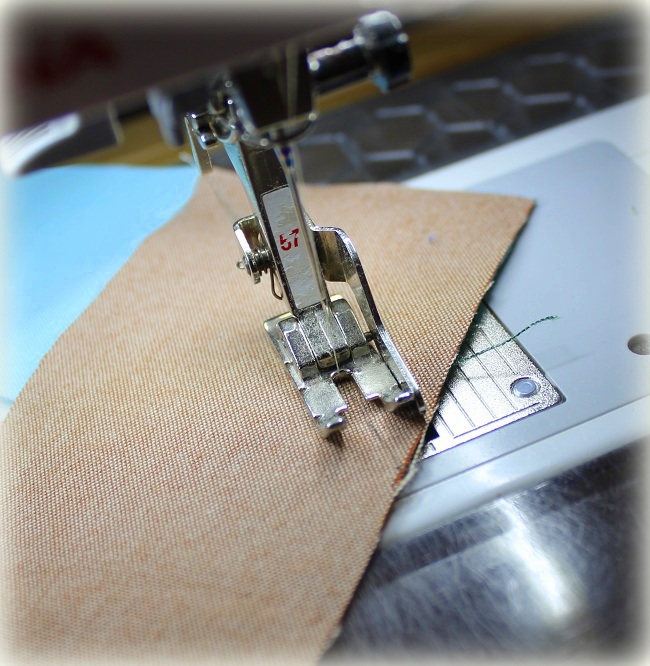
- The steps and diagrams for diagonal piecing:
- Place 2 fabric strips perpendicular to each other
- Draw a diagonal line. I always draw the diagonal line, and make sure the diagonal seams works before pinning and sewing.
- Trim 1/4″ away from sewn line. Open and press seam open.


So, here you see my hodge-podgey pieced quilt center:

PART 3: TEMPLATES & FUSIBLE MACHINE APPLIQUE
1. The templates provided in the pdf packet are at 100% (no enlargement or reduction required). Click here to download the PDF Packet.
2. They are already reversed for fusible machine applique, except for the leaf labeled SB8. If you want the look exactly like the quilt layout, you will need to reverse that shape before tracing it onto the paper-side of fusible of your choice. [Be sure to note #3 below]
3. Please note that SB 8 is actually SB 9, and SB 9 is actually SB 8.

4. I use the the “window” cutting method (i.e. cutting away excess fusible and only leave what is necessary) when I prepare my applique pieces when applicable. I didn’t do the “window cutting” for the swirl pieces because they are narrow in width. Upon being fused, I finish with buttonhole stitching.

If you are unclear about this method, Pat Sloan has amazing tutorials here:
Fusible Applique, How to make it Soft
Pat Sloan’s Fusible Applique Tutorial
5. For quilt center applique, trace applique shapes are found on pdf page 4-7. Prepare and fuse pieces using method of your choice. Refer to pdf page 1 and 3 for placement guide. (Keyword “guide” — you may change the placement of the pieces as desired).
6. We will wait till the very end for the yoyo’s. So, don’t worry about the yoyo’s for now.
7. I use a very sharp applique scissors to cut out the shapes to prevent fraying. Mine is a pair of Olfa 5″ applique scissors.


8. I do want to show you the layering at places where the swirly stems meet.

9. When I buttonhole stitch around the applique shapes, I use the Mako 50wt thread. On my Bernina machine, I used 2.3 (W) and 2.6 (L) for this project. To start, I normally pull up my bobbin thread to form a tail with the top thread. After stitching, I pull both thread tails to the back of to tie a knot to secure the starting stitches. To end, I simply take the width of my buttonhole stitch down to 0, and shorten the length and take tiny bit in the last few stitches before cutting my threads.

10. Here is my quilt center, complete with applique pieces. You will notice I moved my SB 3 leaf further down to the bottom left of the quilt center.

11. Here are a couple of close up pictures of my applique piece finished with buttonhole stitches. I didn’t stitch around the birds because I will be using quilting to embellish them.

***
Alrightie, Friends! I hope you had fun tackling the quilt center of our Quilt-Along. Remember to enjoy the journey! I shall see you in two weeks.
– – – – – – – – – – – – – – – – – – – – – – – – – – – – – – – – – – – – – – – –
ABOUT WENDY:
 Website — Instagram
Originally from Southeast Asia, Wendy came to the US for her tertiary education. After her degrees in Chemical Engineering, she worked in research in a wind tunnel for a spell. Nowadays, she is a stay/work-at-home Mom to a 7 year old. Wendy’s designs have been featured in major quilting publications, both home and abroad. She is also an author for Landauer Publishing, as well as an online quilting instructor. She is passionate about encouraging quilters to enjoy their quilting journey. During her free time, she loves to read history, and indulges in hand needlework.
I hadn’t thought of trying this quilt along but after reading your instructions and seeing the photos I just may give it a go. I love your original quilt version. It looks so complicated to me.
Hello Liz,
I tend to only make quilts that “look” complicated. :o) Give it a go, and you know where to find me if you have any questions!
An absolutely fabulous tutorial. Thank you Wendy and Aurifil Thread.
I’m thrilled that I get to “stitch along” with Wendy, creating this awesome quilt!!
It is so beautiful. I have to give it a go. Wish me luck!
Pam from Canada
Great tutorial! I usually use a tight zigzag stitch or just straight stitch with frayed edges. I think I’ll give the button hole stitch a try!
I added this into my list of things (which is way too long) that I have going because I fell in love with it when you first posted about it. I already have my background strips…but I keep changing my mind how I want to lay them out. I guess I have to make a final decision and get going now! Love this quilt!
Hey Wendy! Looks terrific. Not sure if I’ll play along or not, but will definitely be following. Not much sewing going on over here, but thousands of UFOs….giggle.
I finished my center block earlier in the week. I’ve been anxiously waiting for today. Wendy, your instructions are well written, easy to follow and I appreciate the pictures. I wish I could call in sick tomorrow so I could play 🙂 Tonight I will get started! Thank you for sharing this amazing looking quilt.
Oh my, Deb!!! Do email us a picture of your quilt center: wendy2@wendysheppard.net. I would dearly like to see it!
Hello Wendy. I have two quick questions…. I am moving along with the background square for the Quilt-Along,. You haven’t mentioned the use of stabilizer behind the 20″ centre square to make the applique a little more stable. I gather that you don’t use it. Also, another presumption, the seams for the centre square are pressed ‘open’ rather than to one side.
If you could clarify these for me, I would be very appreciative.
Thanks
Glenice
Well, tomorrow, I will do my best to get thru the whole middle section… With applique… This was a good tutorial, PDF is great, just wish the instructions could be printed out…! 😔