
In July of this year, we presented Amanda Murphy’s debut Aurifil thread collections, Piecing and Quilting and Appliqué, which were selected to coincide with both Sewing Room and Feathers & Flourishes, her two most recent collections for Benartex. We’ve loved learning more about how Amanda uses those threads to take her projects to the next level, particularly with her use of our 28wt thread for machine appliqué. We’re thrilled, today, to introduce you to Amanda for a very special guest post/tutorial sharing her tips and techniques for using heavier weight threads to add texture and dimension to appliqué.
– – – – – – – – – – – – – – – – – – – – – – – – – – – –
Hi everyone! My name is Amanda Murphy and I’m a BERNINA Quilting and Longarm Spokesperson, pattern and fabric designer with Benartex Fabrics, and author with C&T Publishing. Some of you may have seen my recently-released Aurifil Piecing and Quilting and Appliqué Thread Collections popping up in stores. In support, Aurifil invited me to pop in and share some of my tips for appliquéing with their heavier weight threads with you all. I love to help people discover new tools to add to their quilting arsenal, so I’m happy to oblige!
Aurifil 28 wt threads are my absolute favorite when doing machine appliqué. In my mind, machine appliqué has a different look than hand appliqué, and it has a beauty all its own. I love to really highlight the stitching by using slightly heavier weight threads – it creates a little ridge around the appliqué and adds texture and dimension to the piece. I used my new Appliqué Collection in two recent patterns for my lines for Benartex – “Flourishes”, featuring Feathers & Flourishes, and “S is for Sew”, featuring Sewing Room.


For those of you looking to try out this technique on your sewing machine, here are the steps:
1. Trace your motifs onto the smooth side of paper-backed fusible web. I like Shades SoftFuse when cutting out shapes with scissors or Heat-N-Bond Lite when cutting with a digital fabric cutter, like the Silhouette Cameo. (For fusible appliqué, it is important that you cut all of your shapes reversed from the way they will appear in the finished piece.) The example shown is from my “S is for Sew” pattern.

2. Rough cut your shapes apart and fuse to the wrong side of your fabrics. If you are tracing by hand, “window” your fusible if desired by cutting away the excess fusible in the center of the larger shapes. Read the instructions that come with your fusible – pressing times vary and many fusibles work better with a dry iron. Save some of the scraps to make an audition piece.

3. Cut out the appliqué shapes on the traced lines.

4. Back your background fabric with a tear-away stabilizer or soak the background in 50% liquid starch and 50% water and let it dry overnight, pressing it in the morning. (If your fabric feels like paper, you won’t need stabilizer!)
5. Load a neutral 50wt Aurifil thread in your bobbin.
6. Audition various colors of 28wt Aurifil thread on top of your shapes. If you are a beginner, match the threads to cover up any mistakes, but as you gain more experience, don’t be afraid to make bold choices!

7. Fuse a few of the fabric scraps you saved from Step 2 to some leftover background squares to try out your stitching by making an audition piece. Use the opportunity of making this piece to set your stitch tension just right. You’ll probably need to lower the upper tension a bit so that your bobbin thread doesn’t pop up. If your top thread pops a little through to the back that is ok.

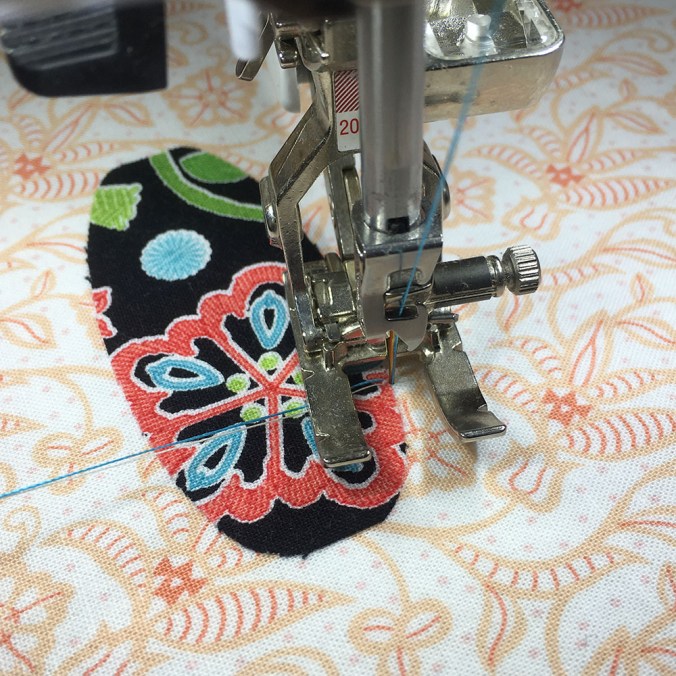
8. Fuse each piece of your appliqué to the fabric and use a blanket stitch to secure. I like stitch #1329 on my BERNINA, set at a 2.1 stitch width and a 2.4 stitch length. To start your stitching, bring your bobbin thread to the top. Leave both threads at least 4’’ long and hold them to the side as you begin to stitch.
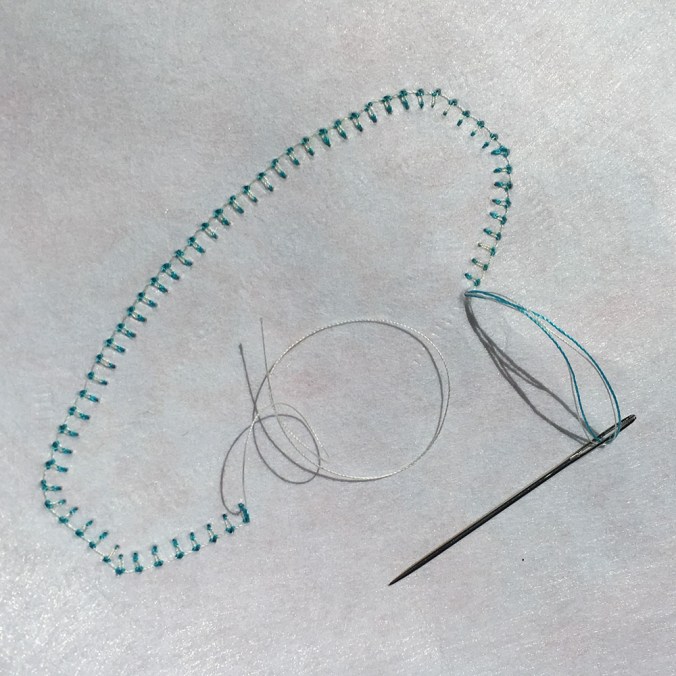
9. To end your threads. stop and clip them so they are at least 4’’. Use a chenille needle to bring the top thread to the back. Tie a knot near the base of the fabric by doing an overhand loop and pulling the threads through, holding your finger close to the fabric to keep the knot towards the bottom of the thread as you would when making a french knot.


10. Sometimes you can appliqué a few of pieces at once, color by color, but with overlapping shapes it is easier to work from the bottom-most object up to the top, burying threads as you go. This minimizes thread stops and starts since you can travel behind a piece with your stitches.

11. Don’t be afraid to make changes along the way and explore new color possibilities!

12. When your stitching is complete, stop and remove the stabilizer. You can score the edge of the stabilizer near your stitching to help make this easier.

13. The threads add so much to the finished piece!

14. Quilt as desired with Aurifil 50 wt or monofilament and bind to finish!

This method of doing appliqué produces such a great look… I never tire of it! Here are some close-ups:


Sometimes I also use 50 wt threads to appliqué in my pieces, particularly if I’m doing it in-the-hoop and I am stitching out embroidered details such as the ones on this machine.

I also use 50 wt thread and a zig-zag stitch for really tiny motifs, like little circles or the blades on these scissors. (You can find 50 wt. in my Piecing and Quilting Collection.)

Then there is Aurifil’s 12 wt thread. It works amazingly well for hand embroidery but you can also mimic that look by loading it into the top of your machine with 50 wt in the bobbin and doing a triple stitch! I love using this technique for stems! (There are 2 spools of 50 wt and 8 spools of 28 wt in my Appliqué collection.)


If you like these designs you can find more about my work here.
I hope these tips help to inspire your next appliqué project! Share your work on instagram and tag @aurifilthread or #Aurifil. (If you used my thread collection please tag me at @amandamurphydesign so I don’t miss it!)
Happy quilting!
— Amanda
– – – – – – – – – – – – – – – – – – – – – – – – – – – – – – – – – – –
ABOUT AMANDA
Website — Blog — Facebook — Instagram — Pinterest — Twitter — YouTube

Amanda and her BERNINA Q24
Always attracted to color, texture, and pattern, Amanda Murphy has been designing, drawing, and sewing since she was a child. She graduated from Carnegie Mellon University with a bachelor of fine arts degree and worked as a graphic designer and art director in Alexandria, Virginia, and New York City. After moving to North Carolina with her family Amanda discovered quilting, an art that marries her passion for design with her enthusiasm for handwork. As she gradually expanded her knowledge of sewing and quilting techniques and combined them with the ideas she had been sketching over the years, Amanda Murphy Design was born.
Amanda markets her own full-color pattern line under the Amanda Murphy Design label and has designed several fabric collections. Her fourth collection with Benartex will debut in Summer 2016.
ABOUT AMANDA’S AURIFIL THREAD COLLECTIONS
Amanda Murphy’s Piecing and Quilting Collection
100% Aurifil Cotton, 50wt (1422yds each, 11 colors, Large Spools):
2250 – 5017 – 2886 – 1128 – 5006 – 5007 – 2440 – 2225 – 2785 – 2600 – 2021
Clear Monofilament (1094yds, 1 Large Spool)

Amanda Murphy’s Appliqué Collection
100% Aurifil Cotton, 12wt (54yds each, 2 colors, Small Spools): 1114 – 2021
100% Aurifil Cotton, 28wt (109yds each, 8 colors, Small Spools):
5005 – 2425 – 2225 – 2720 – 2250 – 5017 – 2620 – 2785

** Images and all biographical text are courtesy of Amanda Murphy.
Such beautiful detailed work. Thank you for sharing your process.
Favorite part of quilting is seeing it come together..after cutting & piecing..and the finished up & given to person that that will love & use & appreciate it..no matter how simple it is! 🙂 The Smiles are the Best part of quilting!! 🙂
Thank you for chance to win your Give-a-way too! 😀
Thank you for such an informative article. I will surely try the 28wt of Aurifil on my upcoming Halloween projects.
did not know i could use 28 in top of machine, thought it had to be bobbin work thanks for the info.
Great work, Amanda!
The 28wt thread looks wonderful for applique. I hope to purchase some soon. It’s beautiful!
This is really well written and the photos are very clear so I can’t wait to try it. I have a Bernina too so I will try your settings
My favorite part of quilting is the one I am doing right now.
Thank you for the giveaway.