
This installment of Wendy Sheppard’s Thread Journey Quilt Along brings us through step two of the process of quilting. We are so grateful for Wendy’s instruction and always in awe of her skill. We’ve loved seeing your quilts so far and can’t wait to see how everything goes with the quilting! If you’re sewing along and want to share your images on Instagram, please consider tagging Wendy (@ivory_spring), Aurifil (@aurifilthread)and #threadjourneyquiltalong so that we might share in your process! Have fun and happy stitching!
– – – – – – – – – – – – – – – – – – – – – – – – – – – – – – – – – – – – – – – –
Hello Quilting Friends, I hope you have been well. We will be quilting the next two borders in our Thread Journey quilt: narrow border and Ohio Star border. Like last week, I will first share with you how I quilted mine, and then, offer a couple more optons.

Narrow Border
a. I quilted a one-sided feather plume to go around the entire border. That effect gives a “framing” effect on the applique quilt center. Since, my quilt center is heavily quilted, the “frame” gives the eye a bit of rest before moving onto the next border. I call it my “Old Masters” border technique, like how some old paintings are framed by wavy frames.


To quilt the frame border, see the schematic below for steps:
#1. Quilt a wave outline down the center of the border. You may eye it, or mark it with a fabric washer marker.
#2. Add a string of pearls. This is optional depending on your preference. Note that the border is quite narrow. I did it as a personal challenge to see how small I could quilt the circles.
#3. Add feathers. I added a mix of completely and partially formed feather lobes. Feel free to use all complete or all partial feather lobes! Click here if you would like a quick primer on my thoughts on how I form quilt my feathers.

b. Other options:
#1. Loopies
#2. Swirly border – My solid lines denote the stitching, and the dotten lines denote the return stitching in order to form the next swirl.
#3. Wave – You may choose to just quilt the wavy line down the center of the border, or add a second pass (dotted line) to form a shadow work effect.

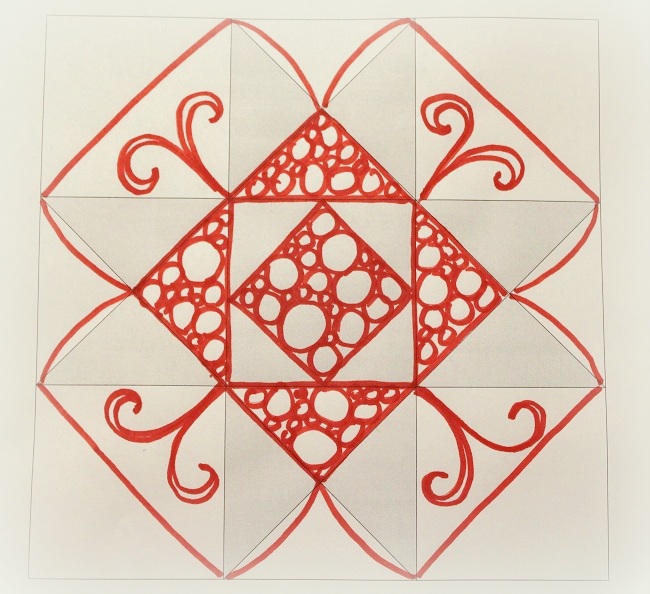
Ohio Star Border
a. I mentioned to you last week oftentimes what I have in mind for my quilting scheme doesn’t quite turn out in real life. My Ohio Star border is an example. I had marked these circles randomly all over the border. I was just going to quilt the outline of the circles, and then quilt background quilting (pebbles and my nifty little “S”) in between the circles to give the look of the galaxy.


I learned something really quickly — my original idea would be a nice quilting idea for cotton or silk batting, but for a combination of wool and cotton, the poof was too prominent the effect was not really what I was looking for. So I ended up filling with feathers and pebbles and sprouts.

Click here if you would like a quick primer on my thoughts on how I form quilt my feathers.
Click here for a blog post I did on feather wreaths.
The effect is visually striking, and actually, if you like to feather quilt, it is not very hard — there’s so much going on that overall quilting is quite forgiving on mistakes. But it requires time. I logged 21 hours just quilting the Ohio Star border alone.


All these colors from my Subtle Strings collection came out to play! And here are a couple of shots where you see the colors meet. I love the subtle effect of the colorplay against the different color fabrics used for the stars!


Notice the marked circles sometimes are merely “suggestions”. There’s nothing wrong ignoring markings and quilt with the flow. 🙂 You can see I went out of the circular boundary.

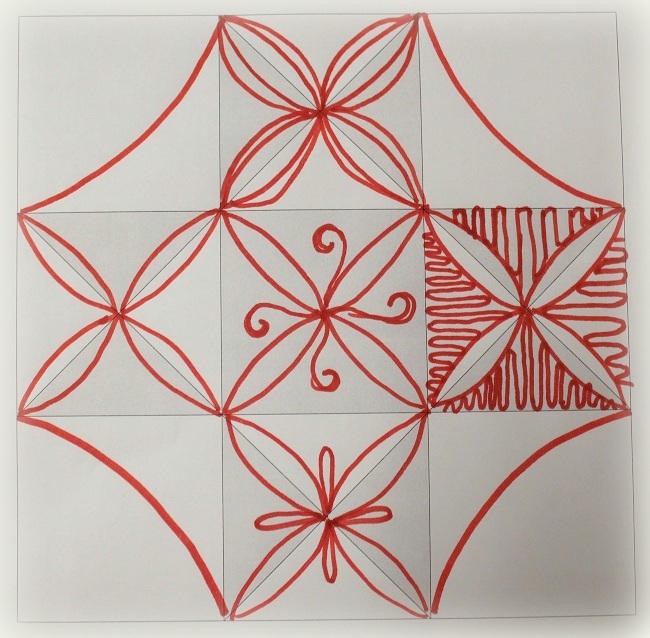
b. You may choose an allover motif to quilt the Ohio Star Border
#1. Nifty little “S” – This is my interpretation of McTavishing using a domestic machine. Click here to see my stitching path.

#2. Pebbles – I like to mix in diffrent sizes of pebbles (circles) — the visual effect is always striking when pebbles are quilted. Click here to see what I mean. I do want to note that the circles do not all have to be perfectly round. In fact, for me it’s impossible to quilt circles free-motion perfectly round. So I find pebbling is a really forgiving motif to quilt.

#3. Sand dunes – I like sand dunes because it is echoing without the stress of keeping the distance even, and I can quilt the dunes far a part for a quick finish. Click here to see how to quilt sand dunes.

c. Geometric interpretation
Another thing I like to do with pieced blocks is use the geometry of the blocks to be a starting point for the quilting. You can see that in I have thrown in background quilting too in the mix in the following diagrams. Feel free to adapt, pick and choose, mix and match for how you would like to quilt your star border.

If you are interested in exploring further machine quilting on pieced quilts, check out my online class (also available in DVD format) here.
Use discount code for 20% off (valid through 12-31-2016]: EALQST

Well Friends, that’s it for now, but not before a final thought. I was let my quilting simmer a couple of days before I decide if I did a good job. I find myself being overly critical of my quilting when I am in the middle of it, but then I always come to the conclusion of my quilting being “not so bad afterall” after walking away from it for a few days.

– – – – – – – – – – – – – – – – – – – – – – – – – – – – – – – – – – – – – – – –
FULL SCHEDULE:
June 2: Thread Journey: Quilt Along with Wendy Sheppard
June 16: Thread Journey: Quilt Construction, Part 1
June 30: Thread Journey: Quilt Construction, Part 2
July 14: Thread Journey: Quilt Construction, Part 3
July 28: Batting & Thread
August 11: Process of Quilting, Part 1
August 18: Process of Quilting, Part 2
August 25: Process of Quilting, Part 3
September 8: Process of Quilting, Part 4 — The Finish!
ABOUT WENDY:
 Website — Instagram
Originally from Southeast Asia, Wendy came to the US for her tertiary education. After her degrees in Chemical Engineering, she worked in research in a wind tunnel for a spell. Nowadays, she is a stay/work-at-home Mom to a 7 year old. Wendy’s designs have been featured in major quilting publications, both home and abroad. She is also an author for Landauer Publishing, as well as an online quilting instructor. She is passionate about encouraging quilters to enjoy their quilting journey. During her free time, she loves to read history, and indulges in hand needlework.
ABOUT SUBTLE STRINGS: (Wendy’s 2015 Aurifil Thread Collection)

12 Large Spools of 100% Aurifil Cotton, 50wt
Colors included:
2310 – 2847 – 4060 – 2130 – 2715 – 5021
2210 – 2510 – 2886 – 2326 – 2423 – 5014
I am enjoying your step by step process. It is teaching me so much.
Gorgeous quilt, yummy threads, excellent tutorial. Thank you.
QuiltShopGal
http://www.quiltshopgal.com
Love the quilting. Thanks for sharing…….
I sew enjoy the process of learning quilting. This post was quite helpful!
I’d love to see the exhibit about China’s quilts
Love this post…. I learned quite a bit from just reading now to try some of these things out…. I enjoyed seeing the photos.. and the process of it all